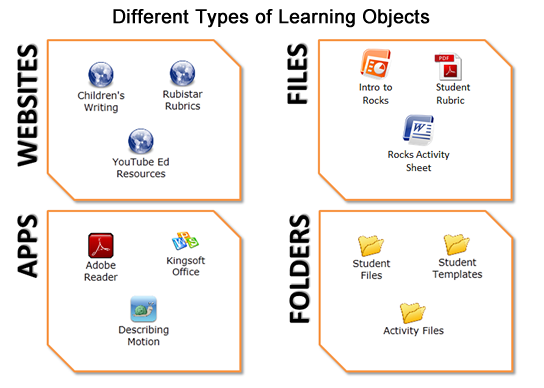
Resources are the building-blocks of your edredi Lessons. A Resource can be a document, website, folder or an application. New or existing content can be added from the computer to the edredi portal. These Resources can come in different forms and serve different purposes. [See examples below]
ADDING RESOURCES
Resources can be added by clicking on Make in the Main Menu. To add a Resource, complete the following steps:
- Click Make in the Main Menu.
- Under Make New, Select Resource.
- Under Resource Type, select the Type:
- Under Called, enter the name you want to give the Resource.
- Click Make It.
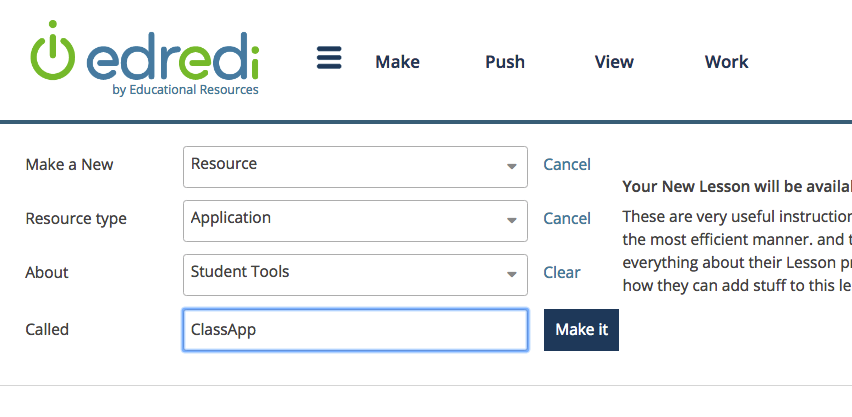 After clicking Make it, the user will be transferred to the Properties Page for the new Resource.
ADVANCED PROPERTIES
Resources have some extra properties that might be useful, particularly if the Resource is going to be published:
RESOURCE ICON
Add an icon either by selecting one from an Organization's images or by clicking the while in the Image Selection Page. Icons are required to be in PNG format.
Images for Category icons should be at least 160x160 pixels, whereas images that are meant to be used as Resource icons can be smaller, like 64x64 pixels.
![]() Image icons can be a great way to recognize certain Resources quickly and easily. It is recommended that the same type of image for specific documents and file types be consistently used. For example, if a YouTube video as a learning object, you could add the YouTube
Image icons can be a great way to recognize certain Resources quickly and easily. It is recommended that the same type of image for specific documents and file types be consistently used. For example, if a YouTube video as a learning object, you could add the YouTube  icon to help recognize this video among the other Resources.
EDITING TAGS
Tags are a way of categorizing Resources, particularly when doing a search. To tag a Resource:
- click the link under the Actions Panel.
- When the page opens, select the appropriate tags for the Resource.
christian louboutin
coach outlet
david yurman sale
coach outlet
rolex watches outlet
coach factorty outlet
jordan 31
converse shoes
birkenstock outlet
cheap nike air max
michael kors outlet clearance
kendra scott bracelet
polo outlet
toms shoes
christian louboutin outlet
cheap jordans for sale
christian louboutin
canada goose jackets
birkenstock
pandora
pandora jewelry
ed hardy clothing
nike air max plus
nike outlet
red bottom shoes
givenchy handbags
mont blanc pens
stone island
coach outlet
michael kors outlet
true religion jeans sale
cheap ugg boots
kendra scott rings
nike shoes
air jordan retro
nike factory
louboutin femme pas cher
hermes outlet
nike air max 2017
coach factory outlet
fred perry outlet
celine handbags
canadian goose
louboutin
fitflops
fitflop
polo ralph lauren outlet
fitflops sale clearance
michael kors handbags
ugg outlet
soccer jerseys
ysl outlet
canada goose
pandora jewelry
pandora outlet
tennessee titans jerseys
coach factory outlet
pittsburgh steelers jerseys
miu miu outlet
hydro flask sale
versace clothing
adidas outlet
uggs italia
adidas nmd
toms outlet
true religion outlet
nike air max
canada goose outlet
maui jim sunglasses
michael kors handbags
north face outlet
coach outlet store
kate spade handbags
fitflops sale clearance
pandora jewelry
vans shoes
nike outlet
jordan 12
fred perry polo shirts
cheap nba jerseys
nike air max
philadelphia eagles jerseys
roshe run
ultra boost
uggs outlet
david yurman necklace
costa sunglasses
cheap jordan shoes
coach outlet
louis vuitton handbags
christian louboutin outlet
kate spade
juicy couture outlet
coach handbags outlet
mbt shoes
coach outlet
qqq